In recent years, the dizzying growth of Facebook, Instagram and – to a lesser extent – Twitter has forced everyone, ordinary people such as public figures and companies, the question: Is it important for me to be on a social network? For any business, the answer can only be «Yes»: managing a social account can be a source of stress and waste of time, especially if take into consideration professional trolls, but it is also inevitable if we want to manage personally the image we offer our customers and our public. We can also respond promptly to any requests for support or clarification from our customers, or questions and doubts before a purchase.
This is not the place to explain how to manage a social account at its best (we can only say that it’s better to be present and engage with your audience). What we recommend is to suggest in your newsletters that your customers may follow you on social channels. To do this, just mention your Facebook page or YouTube channel in a way that makes sense within your content, and above all, report links to your various pages at the bottom of the newsletter. Let’s see how.
Add social icons to your newsletter
MailStyler contains two types of blocks containing the icons of your favorite social networks, and two types of blocks with these icons next to your company’s information (paramount to be compliant with the CAN-SPAM Act, as we know).
- From the “Library” section on the left-hand column of MailStyler 2, choose “Footer” from the “Blocks” drop-down menu.
- Choose the block you prefer: one with only social network icons or one that has two cells (text block and icons).
- Click on the block and then, while holding down, drag it to the template you are working on.
Customize the icons of your social profiles
Obviously, once you have added the Facebook icon, you must make sure that it brings you to your page, whether it’s private or corporate. Maybe, for a branding point of view, do you prefer the icons to be circular rather than square? Nothing simpler:
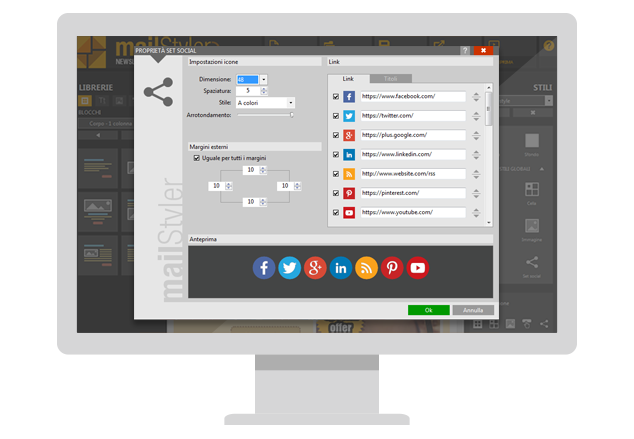
- Double-click on the row of icons. A window with the title “Social Set Properties” will open, consisting of five smaller panels: Icon Settings, External Margins, Advanced, Link, and Preview.
- The latter will show you in real time all the changes you make to the social icons.
- The first panel in the top left-hand corner is “Icon settings” to manage the graphic features.
- To enlarge or reduce the icons you have to choose one of the proposed sizes from the drop-down menu: 24, 32, 48 or 64 pixels.
- You can also increase or decrease the spacing between icons.
- To change the colors of the icons, you have to choose from the drop-down menu “Monochrome”: by default, the menu shows “Full color”, and you will get the corporate colors of the different social networks. However, you can choose to apply to the icons a single color.
- The “External Margins” change the distance between the icons and the edges of the block in which they are set.
- In “Advanced” you can flag “Always save images as a local resource”, so that the icons are displayed by your recipients regardless of export options.
- The “Links”, on the other hand, allow you to enter the exact addresses of your Facebook pages, Twitter profiles, YouTube channels. You can also activate icons from other social networks such as Flickr, Vimeo, Medium. You can also decide to open links in a different browser window if your newsletter is read on the web.


